Back to our regular scheduled program...
Hello again! What a shocker eh? Two posts in as many days. I'm tellin' ya, I'm on a roll. :) Well, I promised that I would be back today with a tutorial on how to get your Silhouette Studio files into svg format. I'll show you the process, but also note here that, programs like MTC or SCAL can import jpg and png file, so you may not need to go all the way to the end of the process. I'm not completely familiar with MTC, and even less familiar with SCAL, so I'm not certain at this point if there is an advantage to importing the svg rather than just a jpg. My only observation right now is that, at least, with a svg file, the tracing is already done for you and ready to put into different layers (if you choose). Not sure how much of a time saver that is...
So, I think I mentioned that I am going to buy a new KNK Zing cutter early next year. The reason I want to export my Studio files is so I can cut them using the Zing. The Zing come with MTC, which is totally a different file type and can't import the proprietary Silhouette Studio files. Silhouette Studio will allow you to export their files as svg files, but only if you have an older version (v1.9 or v2.0) of their Designer Edition software. I'm a cheap ass and don't want to spend the $50 just so I can export when I can get free programs to do it for me. May be a few more steps, but it works.
Ok, so to begin, there are a couple programs you need. All of them free. You need to have Inkscape and Bullzip PDF printer installed. Here are the links for these:
http://sourceforge.net/projects/inkscape/files/
click on: Looking for the latest version? Download Inkscape-0.48.2-1-win32.exe (35.7 MB)
http://www.bullzip.com/download.php
click on: PDF Printer 4.5 MB Free Freeware (up to 10 users) Download | Donate
Of course, I'm assuming you have Silhouette Studio installed, otherwise why would you want to do this tutorial?? Ok, let's start. Here's what I do:
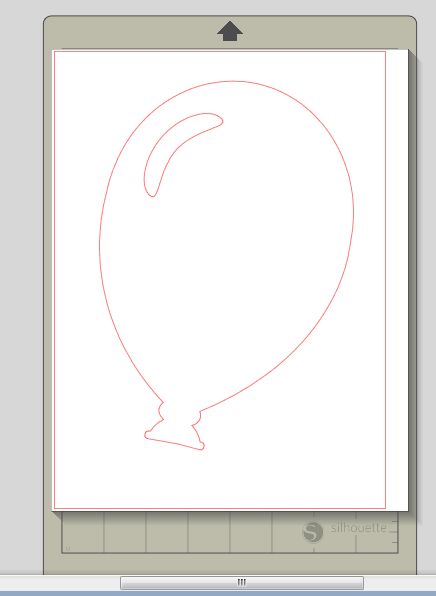
1. Open up Silhouette Studio and open up the file you want to "export". In this case I opened the balloon file that comes with SS:
2. Use Ctrl A to select all images. You could put more than one file on the page, but I wouldn't do too many - maybe 3 or 4 at a time. Just remember if you do more than 1, they will all be part of one file and you will need to save the final converted files separately, and manually.
3. Right click and select ungroup:

4. Select the inner shapes that are cut out. Go to the Fill screen and fill these shapes with white:

5. Now select all the outer shapes and fill these shapes with black:

I chose to use black & white since this will give a really good contrast and make it easier for find the edges of the image. You can choose any colours you want, but I think b&w is probably the best. Also, if your entire image turns black when you fill the outside shapes, you need to "move it to the back" so that the inside shapes are on top and visible.
6. Go to the Lines setup and make sure that the "print cut lines" checkbox is NOT checked:

This is so that when we "export" the image, you won't have the red cutting lines showing (or whatever your default colour is).
7. Now go into your preferences, and then to the output preferences and change the output dpi to whatever you prefer and click the "ok" button. I chose 600 just so I could have a good quality image. I think 300 is probably good enough (that's what most digital scrapbookers use and it gives good resolution for printing, plus your file size will be smaller and load quicker).


8. Now go to File -> Print:

9. Select BullZip PDF Printer and click print (don't worry its not going to actually print a hard copy to your printer):

10. A screen will pop up where you can set the output options for the file. Choose either png or jpeg from the drop down list. I prefer png because they can have a transparent background, but either will work.

11. Click on the Image tab on the pop up window. Here you can change the dpi of the output image. I changed mine to 600, but again, 300 would probably be sufficient. You will change both horizontal and vertical to the same number.


12. Click the Save button and navigate to the folder where you want to save your file.

13. Start Inkscape and open the file you just created.

14. Use Ctrl A to select all your image. Little black arrows will show up around the image. Then go to Path -> Trace Bitmap.

15. A pop up window will open. In the window, change the brightness cutoff setting to 0.500 and then click the ok button. Close the window by clicking the red x in the top right hand corner.

16. Go File -> Save As:

17. Select Inkscape SVG in the drop down list below the name field and then, go to the folder you want to save your svg in and type in the name you want to give the file.

That's all there is to convert your Studio file to svg. The next steps I'm showing are for importing the svg into MTC since that is what I will be using when I get my new Zing. :)
19. Start MTC and go File -> Import -> SVG/SVGZ file

20. Navigate to the folder where you saved your svg file and click on the file. A preview will show up in the preview window if all went well with the export process. Click the open button.

21. This will bring the svg into MTC, but it will be a very, very large image. You will probably have to lower the zoom all the way down to 10% to see it. At this point, you can shrink down the image so that it fits onto your page.

That's it. You can now manipulate the file as you please.
I hope it all made sense and you were able to follow along. As I mentioned earlier, actually converting the file to svg isn't absolutely necessary for MTC or SCAL, so this may be over kill, and you can just use the jpg/png file you created from SS. If you notice any errors, or something doesn't seem right, please contact me using the contact form on the right-hand side of my blog. I'll get back to you with an answer as quickly as I can.
Well, I think I'll try and take some pictures of a few scrapbook pages I made over the last couple months and show them to you in a day or so. I had gotten to the point where I wasn't enjoying blogging for a quite a while, but I've enjoyed doing these last two, so maybe I'll be able to keep it up for a little while. We'll see. I do have a few things I want to show.
That's all for today. See you soon...
Cat
12/21/12: Nicole posted a comment and a question. Nicole, I don't have any way to contact you, so hopefully you see this reply:
You are obviously using the designer edition of Silhouette Studio. You can go into the View menu and turn off the grid so that it doesn't show when you print to pdf.
03/08/14: I've had some questions about the grid marks showing up even though they have been turned off in Silhouette Studio. I've tried to re-create this and can't seem to do it. I'm not sure if its happening with the free version or the DE version since I'm now working in the DE version. I haven't had time to install the free version on a different computer to see if it happening there. The only thing I can tell you at this point is to check to make sure the grid lines are turned off. When I get time to install all the programs on a different computer, I'll report back to let you know if I've been able to duplicate the problem and if I've been able to find a solution.
Cat


42 comments:
Excellent tutorial!
Have already tried it and it works perfectly! Thank you so much!
Thanks so much for this explaination...so easy to follow.
Thanks for the great tutorial! I have a question about tracing the image in inkscape. When I import the pdf file into inkscape, it shows up with the grid lines from studio in it. I don't know how to get rid of them. And inkscape can't seem to trace the image (it thinks the image is actually like 20 some different images. ) Any suggestions? thanks!
Great tutorial. The one thing I was wondering, have you figured out how to get the dashes (score lines) in a pattern? I can't seem to get them to come out. But, I will say yourn is the first tutorial I've seen that is easy to follow and works. If you have got a way to make it work could you please email me at daniellekellogg@yahoo.com
Thanks
just wondering if you could tell me how i can do this using illustrator? Thanks!
To get the dashes you need to click the print lines box and just make sure those are the color you want to show up. :)
I was so excited to find this tutorial! I had trouble getting inkscape to download, so I thought I would just skip that step and trace my png file in MTC. I am getting a great trace,except I only get about 2/3 of my image. Part of it is just missing. I can see the whole thing in Studio but not in the png file. Any suggestions?
I figured it out. I changed the size of my page. Thanks for this great info!!
I was wondering if you could tell me how to get rid of the white back groud after i have opened the SVG file in SCAL? I found this tutorial extremely helpful as I could never get anythign traced correctly in SCAL as I could in the Designer edition of Silhouette, i was payign a tracing company to do it for me each time. Now with the SVG files there is no need for me to do that anymore thanks so much im savign a tone of money now!
Thanks
Thank you so much for sharing this! I did a logo for someone within the Silhouette Studio and wanted to be able to send it to her as a jpeg so she can print it on other things. Off to check out the rest of your blog now!
I hate, and I mean hate, reading directions to learn how to do something. That being said, your directions were neat and concise and, for once, I didn't mind reading directions!
Thanks for all the information! I actually enjoyed it and I learned something! Go figure.
I especially liked that you can click the pictures to view them separately!
FYI: I had to figure out how to change the page size for those popular 12x12 designs. I know it probably is easier for those who actually read the manuals for these softwares but for me, it's always trial and error. I ended up picking ARCH H (or something to that effect) so I could get the whole view. If there is a better "size" please don't hesitate to email it to me, or comment here.
Thanks again! Busy changing files!
April
Can I do this on my MAC?
Thanks for the great tutorial!!!!
Have already tried it and it works perfectly! you are a Genius!!!!
Excellent tutorial!
Have already tried it and it works perfectly! you are a Genius!!!
One thing you forgot to mention is that you have no need to download free software if you already own software (e.g., Adobe Acrobat & Adobe Illustrator, for example) that will do the job. You'll only need the software you noted if you do not have existing software to accomplish the requisite tasks. And thanks for this. I have an old Cricut Expression and a Silhouette Portrait and do not want to have to spend the bucks for a Cameo so that I can cut sizes larger than the Portrait can handle!
Hello there!
How about a box template that on the ''inside'' of the template has folding lines? Is it necessary to ungroup it? I don't know why but I get a blank page when I save it. Or also i get only the half of the image when I export it. Thx
Hello
We have just bought a roland GX24 after using a silhouette cameo for ages, and this worked perfectly for moving all our files from studio to jpeg to cst
Thank you so much you have saved me loads of time
Michele
Thank you for this tutuorial
we have manged to save our files from silhouette cameo into our new Roland GX24 in a fraction of the time
Thank you so much
Do you know maybe how to convert to DXF ? I have no designer edition .
Ps: Tutorial great .
Thank you so much... This helped out a lot.
Thanks again for a great tutorial!
@ Miroslaw Horaczko
In inkscape, you have the option to either export or save as (can't remember and I don't have inkscape installed anymore) as a dxf file. If you have Illustrator, you can export your trace as a dxf file.
HTH...
Thank you so much! Your tutorial really is a great help :).
Thanks this has been of enormous help to me and sorted out a .studio file that I couldn't access...
Thank you so much. This tut is such a big help. I actually converted a file. Didn't think I could ever do that.
I have a question about the gridlines, too. I have them turned off (they DO NOT show up on in studio) but if I try and print it or get it into inkscape, there they are. I have tried turning EVERYTHING off, but they keep showing up.
Just found this and I think it's going to be a time saver for sure! I followed the steps by I'm only getting part of my design when I open in inscape? It's showing the fill design in Silhouette so it's just when I open in the other. Thanks in advance!
Thanks for this tutorial. I am actually wanting to export some of my purchased silhouette designs to use on digital scrapbooking layouts in photoshop. I was able to do this following these instructions, but for some reason even though I was turning it into a .png it still came in with a white background instead of transparent when I opened it in photoshop. That's not a huge deal because I can get rid of the background in photoshop. But I feel like my shapes have rough edges instead of smooth lines even though I upped the dpi to 600 like you recommended. Any thoughts on this?
Thanks so much for the tutorial. I found it looking for a way to convert my silhouette images into something I could use on a digital scrapbooking layout in photoshop. I was able to convert the images to a PNG and open them up in photoshop which was great. But for some reason they came in with a white background instead of transparent. This isn't a huge deal because I can get rid of the white background, I'm just not sure why it was there. But I feel like the edges of my shapes are pretty rough instead of being smooth, even though I upped the dpi to 600 like you recommended and even tried it at 1200. It was still very rough. Is that just how it will be or is there a way to get smoother lines when I export shapes?
Hello!
I was wondering if there was a bull zip version for MAC?
Hello!
I was hoping you knew of a bull zip version for MAC?
I was also having the issue with the gridlines when printing to xps viewer. However, I noticed when I double clicked on the document the gridlines went away...potentially a work around for others...
Fabulous! I did not know about bullzip. That is a timesaver. Thank you for posting.
Thanks for the clear instructions. Worked perfectly for me!
Thank you so much for a great tutorial.... I will be trying it very soon :)
Keep reading if you want your original vector file back, without tracing...
Sorry for being the critic here, but what you are doing is exporting a flawless vector document into a pixel document and then tracing it? This is plain ridiculous. The files in your library are on your hard drive and are in vector format (if you imported a vector svg file that is). It is very easy to hack these back to svg. Here's how (doing OSX here, but I imagine Windows is the same except for the file location):
Look up the folder where Silhouette saves your library. On OSX this is '/Library/Application Support/com.aspexsoftware.Silhouette_Studio.8/Library02/'. There you'll see a folder with a name that contains a lot of numbers. This 'number name' is probably different for everybody. Open it. In that folder you see again a bunch of folders named as numbers. Now here's the trick to find the folder your design is in. Check in Silhouette how many files are in, for example, 'My Own Designs' (if your design is there). If you have for example 30 designs in there, you need to look for the folder that contains 31 files (as there is 1 file called dir in each folder + the amount of designs). All file names are numbers, so you need to check one by one probably. Anyway, here's the magic. If you imported these files as vector SVG, they still are SVG. But you need to 'hack' it a little. Copy the file to your desktop, to leave the original folder untouched. Open the file in TextEdit (I used BBEdit) and remove "silhouettelibrary02 κ" from the code (make sure the code starts with ). Also scroll down and remove everything after the "" tag. Convert the filetype to "UTF-8" and save it with the .svg extension. Now you have a perfect vector SVG file you can open in Illustrator. Without the need to trace it...
@Don Macaroni. I think you have missed the point of this tutorial. We are trying to take the studio file - ie the .studio format that is unusable in any other software other than Silhouette Studio - and make it into a file format that can then be opened or imported into other graphic editing software that can then save the file as a file type such as svg that can be used in other software - such as Make the Cut or Sure Cuts a Lot. These files are not imported svg files - why would anyone suggest that you import a vector file only to make it into a rasterized file to just turn around and make it into a svg file. I'm not sure if you're familiar at all with electronic cutting machines, but I suggest you read the tutorial before telling the creator (me) that its "ridiculous".
Hi Cat, sorry for the "ridiculous" word, did not mean to offend you. Just wanted to point out that converting a vector source file to a pixel file, and then making it vector again seems a little complicated and not 100% precise. I have a sign company with a lot of machinery and understand the file handling of these machines pretty good, so no issues there.
I actually bumped onto your blog because I made a design for somebody and lost the original file. After trying your instructions I discovered that you were actually converting to pixel and back and figured that was not precise enough for me - I needed the original file. So your blog actually lead to me digging a little deeper and discovering what I needed, so thanks for that.
I see the balloon sample in your blog is also vector and I would love to find out if these can be converted similar as the .svg file I did. Is this a file from the Silhouette website? Or can you send it to me?
The idea of the blog is to exchange ideas and discoveries and to help each other out. Again, was never my intention to undermine you or insult you in any way.
@ Don Macaroni
I must apologize for my earlier reaction. I was not in a good mood the day I read your comment. It rubbed me the wrong way at the time, but that was just over-reacting on my part. I meant to delete my comment, but didn't get back to it in time.
The balloon file is a Silhouette Studio file that I can't give to you, but you can get it if you download their software and install it. I read about "hacking" the files the way you describe before, but I didn't want to put a lot of technical stuff that some may not be comfortable doing. I'm going to give your method a try and if I can get it work for me then maybe I can figure out a batch script to convert the 2000+ files I have in Silhouette Studio.
Helpful hint for those on a mac that end up with gridlines when printing to a pdf.
Steps for a MAC: Macs do not need Bullzip because we have the print to pdf capabilities.
1. When you go to print, select 'open pdf in preview'
2. This pdf will have gridlines in it. Go to 'File' and 'Export'
3. Export the file as PNG
4. Re-open the file in Preview- and voila! Gridlines are gone. Then you can re-save as a pdf or whatnot, or just use the png file as is.
5. Then you can use inkscape (yes, it's compatible on a mac if you also download XQuartz)
You can also watch this video which taught me how to do it: https://cleversomeday.wordpress.com/2014/11/06/ssprintables/ (last video on page)
Don and Cat, is this still the best way to change large numbers of files quickly? (I have the latest version of their software) I would like not to have touch each file individually.
Thanks
Hi, I'm not sure if how old some of these comment are but I really need some help. I have done some of my own designs in Silhouette Designer, I use a lot of none solid lines and can't use this system or any other I've found as it degrades the image to much. I really need to understand the hack for PC to change the files I've created in to SVG so I can use them as I need to get them cut commercially now.
Thanks for any help
PS sorry if I've posted this twice, I seem to be having issues saving it.
I just want to say thank you. I do read the comments and I actually found my answer there. OMG!! I am so excited!!
Post a Comment